
Introduction of JavaScript z-index
We see many websites where elements like banners, text, dialogs get overlapped among themselves. This can be achieved using the zIndex concept. JavaScript zIndex is a property used to set or get stack order of positioned element. Based on the zIndex value, elements get positioned on front of another element or at the back of the other element. Greater the zIndex, target element is in front of another element which has lower zIndex relatively. Let us get deeper into this concept and understand how this JavaScript zIndex works.
Syntax of JavaScript z-index
To return the zIndex property:
var z = object.style.zIndex;To set the zIndex property to an element:
object.style.zIndex = auto|inherit|number|initial;Defining the property values as ‘auto’ being the default which sets the stack order equal to the parent element. ‘number’ sets the stack order based on the value, and most importantly negative numbers are not allowed.‘inherit’ will inherit the zIndex value from the parent element.
- z-index :auto; //Keyword value;
- z-index : 5; //Integer value;
- z-index :-2; //Negative integer value, lowers the priority of element.
- z-index : initial; //global values like inherit, unset, etc.
Issues related to stacking of elements in a complex web application becomes a major pain to the web developers, hence this JavaScript zIndex property is useful in setting up the elements accordingly.
Before getting into the Implementation of zIndex property, we need to know another related concept i.e. Hierarchy of Stacking Elements.
- Let us consider webpage is of 3 dimension, then the zIndex value/ property defines the z coordinate of the element; also knows as Stacking Order.
- Based on how large the property is, that close would be the element to the user.
- zIndex value space is not flat and is Hierarchicali.e. Element creates a stacking context with a zIndex value which becomes the root value for other Descendants.
- Let us consider document body having descendants: div1, div2., div3, div1-1, …div1-1 being the child descendant of div1.
zIndex values of div1: auto, div2: 20, div3: 5, div1-1: 30.
- An element creating zIndex creates stacking concept which makes a base for children’s zIndex values.
Examples of JavaScript z-index
Following are the examples are given below:
Example #1
We shall consider the above-mentioned example with the document body.
Code:
<html>
<style>
div {
box-sizing: border-box;
border: 2px solid black;
padding: 5px;
position: absolute;
font-family: Verdana;
}
.div1, .div2, .div3 {
width: 500px;
height: 200px;
}
.div1-1 {
width: 200px;
height: 150px;
}
.div1 {
left: 10px;
top: 10px;
background-color: rgba(220, 210, 170, 0.9);
}
.div1-1 {
left: 250px;
top: 30px;
background-color: rgba(210, 170, 170, 0.9);
z-index: 30;
}
.div2 {
left: 20px;
top: 90px;
background-color: rgba(220, 170, 210, 0.9);
z-index: 20;
}
.div3 {
left: 30px;
top: 170px;
background-color: rgba(170, 220, 210, 0.9);
z-index: 5;
}
</style>
<body>
<div class="div1">
<strong>div1</strong>
<br/>
(z-index: auto)
<div class="div1-1">
<strong>div1-1</strong>
<br/>
(z-index: 30)
</div>
</div>
<div class="div2">
<strong>div2</strong>
<br/>
(z-index: 20)
</div>
<div class="div3">
<strong>div3</strong>
<br/>
(z-index: 5)
</div>
</body>
</html>
Output:
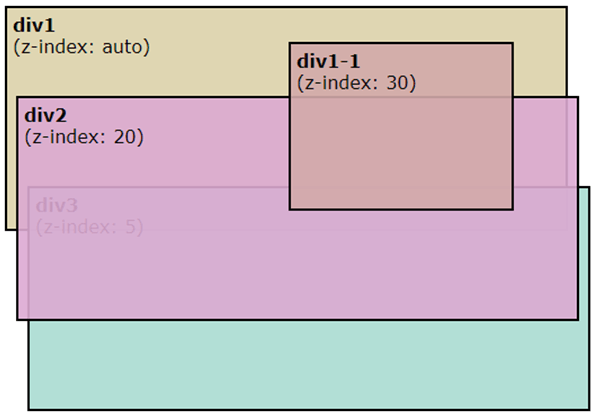
Above CSS are to display the div with zIndex separately.
Example #2
Code:
<!DOCTYPE html>
<html>
<head>
<h2>JavaScript zIndex</h2>
<style>
.zindex1 {
z-index: -1;
background-color: #00F8;
width: 150px;
height: 100px;
position: absolute;
top: 80px;
left: 80px;
}
.zindex2 {
z-index: 1;
background-color: yellow;
width: 150px;
height: 100px;
position: absolute;
top: 140px;
left: 145px;
}
</style>
</head>
<body>
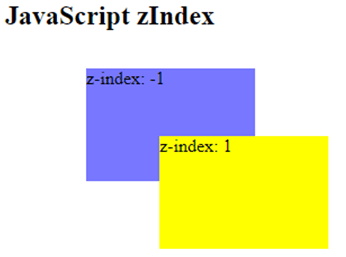
<div class="zindex2">z-index: 1</div>
<div class="zindex1">z-index: -1</div>
</body>
</body>
</html>Output:
Example #3
Code:
<!DOCTYPE html>
<html>
<head>
<style>
p {
margin: 0;
position: absolute;
top: 50%;
left: 50%;
transform: translate(-50%, -50%);
}
div{
margin: auto;
position: absolute;
top:0;
left: 0;
right: 0;
bottom: 0;
}
div:first-child {
background-color: yellow;
width: 300px;
height: 150px;
z-index: -5;
}
div:last-child {
width: 280px;
height: 120px;
z-index: -1;
background-color: lightblue;
}
</style>
</head>
<body>
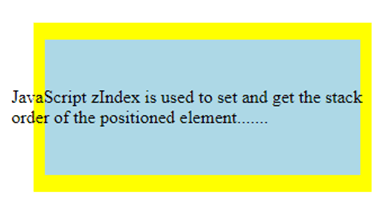
<div>
</div>
<p>JavaScript zIndex is used to set and get the stack order of the positioned element.......</p>
<div>
</div>
</body>
</html>Output:
Example #4
Code:
<!DOCTYPE html>
<html>
<body>
<h1>JavaScript zIndex property</h1>
<img id="img" src="https://www.tutorialspoint.com/tensorflow/images/tensorflow-mini-logo.jpg" style="position:absolute;left:0px;top:0px;z-index:-1;width:650px;height:300px;">
<button type="button" onclick="zIndexFunction()">Click here to get the zIndex value</button>
<p>Default z-index is 0. Here image is at the back of the text since zIndex value is -1 which is less than 0.</p>
<script>
function zIndexFunction() {
alert(document.getElementById("img").style.zIndex);
}
</script>
</body>
</html>
Output:
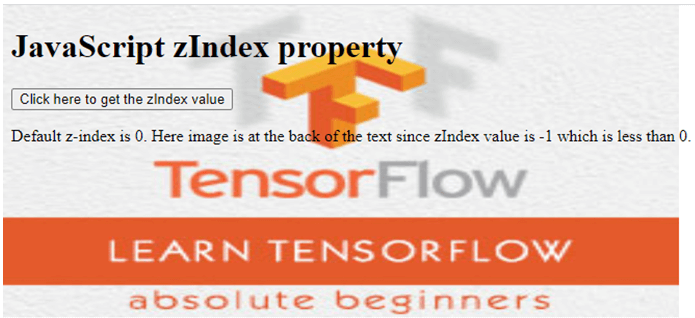

Let us change the zIndex value of image from -1 to value greater than 0.
Example #5
Code:
<!DOCTYPE html>
<html>
<head>
<style>
.dashed-box {
position: relative;
z-index: 5;
border: dashed;
height: 8em;
margin-bottom: 1em;
margin-top: 2em;
}
.bluebox {
position: absolute;
z-index: 7;
background: lightblue;
width: 70%;
left: 60px;
top: 4em;
}
.yellowbox {
position: absolute;
z-index: 6;
background: yellow;
width: 20%;
left: 65%;
top: -25px;
height: 7em;
opacity: 0.9;
}
</style>
</head>
<h2>JavaScript zIndex representation</h2>
<body>
<div class="dashed-box">Dashed box zIndex 5
<span class="bluebox">Blue box zIndex 7</span>
<span class="yellowbox">Yellow Box zIndex 6</span>
</div>
</body>
</html>
Output:
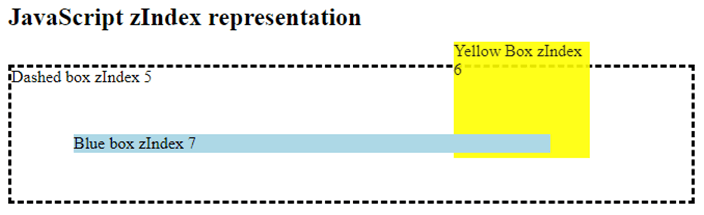
Here, the dashed box has zIndex less than that of the yellow box, hence the yellow box is on top of the dashed box. It is the same with the Blue box also, zIndex is greater than the yellow box, hence displayed above the yellow box. You can try changing the zIndex values and see how the boxes overlap on each other.
Conclusion
With this we come to an end of the concept JavaScript zIndex.zIndex property helps in web applications to not get overlapping of the elements and to display each element perfectly without making the website look clumsy. We have seen Stacking Hierarchy concept too to understand the zIndex concept further. Also have seen some examples which will be useful for us, also can try your hands on with these examples by changing the zIndex values.